Auto Slate User's Manual
Stand Alone, Inc.
Updated 9/17/03 for v.
1.29
Table of Contents
1 Welcome and
Registration............................................................... 6
1.1 Included
Files......................................................................... 6
1.1.1 Readme.txt....................................................................... 6
1.1.2 Autoslate.prc..................................................................... 6
1.1.3 Manual
Folder.................................................................... 6
1.1.4 License.txt........................................................................ 6
1.1.5 Order.html........................................................................ 6
1.2 System
Requirements.............................................................. 6
1.3 Registering
Auto Slate............................................................. 7
1.3.1 How
to Register.................................................................. 7
1.3.2 Necessary
Information....................................................... 7
1.3.3 Entering
the Registration Code............................................. 7
1.3.4 Contacting
Stand Alone Inc................................................. 8
1.3.5 Business
Hours................................................................... 8
1.3.6 Email................................................................................ 8
1.3.7 Phone............................................................................... 8
1.3.8 Regular
Mail....................................................................... 8
1.3.9 World
Wide Web................................................................ 8
1.4 Reporting
Problems................................................................. 8
2 Installing and
Upgrading Auto Slate.................................................. 9
3 Restoring Auto Slate
software and data............................................ 9
4 Using Auto Slate............................................................................. 9
4.1 Getting
Started..................................................................... 10
4.2 Main
Page............................................................................. 12
4.2.1 Mode
Indicator................................................................. 13
4.2.2 Odometer........................................................................ 14
4.2.3 Main
List.......................................................................... 15
4.2.4 Filter
Control and Filter Display Menu.................................. 16
4.2.4.1 Filter Control Menu: Display............................................ 16
4.2.4.2 Filter Control Menu:
Odometer........................................ 17
4.2.4.3 Filter Control Menu: Type................................................ 18
4.2.5 The Calendar and With/For Filter Menus.............................. 18
4.2.5.1 Calendar Filter Menu...................................................... 18
4.2.5.2 With/For Filter Menu...................................................... 19
4.2.6 The
New Button................................................................ 20
4.2.7 The
Date Chooser............................................................. 20
4.2.8 The
Vehicle Menu.............................................................. 21
4.2.9 The
Main Page Events Menu............................................... 21
4.2.9.1 New Fuel Event.............................................................. 21
4.2.9.2 Show All....................................................................... 22
4.2.9.3 Change Mode................................................................. 22
4.2.9.4 Next Oil Change............................................................. 22
4.2.9.5 Set Custom Filter........................................................... 22
4.2.9.6 Postpone Alarms........................................................... 22
4.2.9.7 Purge Records............................................................... 22
4.2.10 The Main Page
Options Menu.............................................. 23
4.2.10.1 Preferences................................................................ 23
4.2.10.2 Insurance................................................................... 23
4.2.10.3 Fuel Economy.............................................................. 24
4.2.10.4 Enter Registration
Code................................................ 24
4.2.10.5 About Auto Slate......................................................... 24
4.3 The
Events Page.................................................................... 24
4.4 Vehicle
Page......................................................................... 25
4.4.1 Vehicle
Menu.................................................................... 25
4.4.2 Data
Entry Fields and Menus.............................................. 25
4.4.3 New
Button...................................................................... 26
4.4.4 Done
Button.................................................................... 26
4.4.5 Delete
Menu Item............................................................. 26
4.5 Event
Detail Page.................................................................. 26
4.5.1 Vehicle
menu................................................................... 27
4.5.2 Date
Chooser................................................................... 27
4.5.3 Odometer........................................................................ 27
4.5.4 Vendor............................................................................ 27
4.5.5 Cost................................................................................ 27
4.5.6 Notes.............................................................................. 27
4.5.7 Cancel
Button................................................................... 27
4.5.8 Done
Button.................................................................... 27
4.5.9 Events
Menu.................................................................... 27
4.5.10 Specific Event
Detail Pages................................................ 28
4.5.10.1 Fuel............................................................................ 28
4.5.10.2 Oil.............................................................................. 28
4.5.10.3 Tires........................................................................... 30
4.5.10.4 Maintenance................................................................ 30
4.5.10.5 Glass.......................................................................... 31
4.5.10.6 Battery....................................................................... 32
4.5.10.7 Wash.......................................................................... 32
4.5.10.8 Fluids......................................................................... 33
4.5.10.9 Accident Pages............................................................ 33
4.6 Vendor
Page......................................................................... 34
4.6.1 Vendor
List...................................................................... 35
4.6.2 New
Button...................................................................... 35
4.6.3 Delete
Button.................................................................. 35
4.6.4 Edit
Button...................................................................... 36
4.6.5 Done
Button.................................................................... 36
4.7 Fuel
Economy Page................................................................ 36
4.8 Trip
Detail Page..................................................................... 37
4.9 Insurance
Page..................................................................... 39
4.10 Preferences Page.................................................................. 40
4.11 Alarms................................................................................. 41
4.11.1 Oil Alarms........................................................................ 41
4.11.1.1 Odometer Oil Alarms.................................................... 41
4.11.1.2 Calendar Oil Alarms...................................................... 42
4.11.2 Maintenance
Alarms......................................................... 43
4.11.2.1 Fulfilling Alarms........................................................... 45
4.11.2.2 Postponing Alarms....................................................... 46
4.12 Exporting to Date
Book.......................................................... 46
4.13 Using the Auto
Slate Conduit................................................... 47
1
Welcome
and Registration
Auto Slate is a record-keeping application for cars, trucks, and motorcycles. It is intended to provide a template for storing and organizing information about anything that happens to your vehicle.
1.1 Included Files
Included in this archive are the following packages:
1.1.1 Readme.txt
This short file contains information on registration, ordering the software, and the license agreement.
1.1.2 Autoslate.prc
This is the software package that you need to install on your Palm Powered Device.
1.1.3 Manual Folder
This folder contains both a text and html version of the user's manual, as well as an images folder which contains the graphics for the html manual. To use the html manual, open it using any web browser. The text manual can be opened by any word processor.
1.1.4 License.txt
This file contains the software license agreement. Please read this before using the software. By installing, copying, or otherwise using this software, you agree to be bound by the terms of the license agreement.
1.1.5 Order.html
This document provides a link to our web site to order the software. To use this link, first open Order.html though a web browser while connected to the internet. Tap the link, and you will be taken to our web site.
1.2 System Requirements
Please refer to the Auto Slate product Page at http://www.standalone.com/palmos/ for any updates to the list of supported Palm Powered devices. Throughout this manual, Palm Powered device is used to refer to all of these units.
1.3 Registering Auto Slate
Auto Slate is demoware, and costs $15.00
Stand Alone, Inc.'s software is called 'demoware', which means that we allow our users to try our software, fully functional, for 30 days. After 30 days, our software expires and becomes disabled until you register it. In order to register our software, you must purchase it. However, once you purchase our software, the lifetime registration allows you free upgrades to any future version of the software.
1.3.1 How to Register
There are several ways you may order your registration code from us.
You can order online at this website, using our shopping cart. Please Note: Our Shopping Cart requires that you use a current browser, such as Internet Explorer 4.5 or better, due to security precautions.
Fax us at 773-477-2579
Call us during our business hours of Mon-Fri 9am-5pm CST at 773-477-2492.
Email us at sales@standalone.com
1.3.2 Necessary Information
Please have the following information ready when you contact us: your Palm User Name, and the Program Name
1.3.3 Entering the Registration Code
You can enter your registration code by one of two ways:
If your program has expired, simply enter into the program that you have registered and then tap the Enter Registration Code or Enter Password button on your Page. Then enter in the registration code.
If your program has not expired, then you must go into the program and then tap on your Menu button. The Menu button is located on your graffiti pad. Then tap on Option at the top of the Page. Finally, tap on Enter Registration Code or Enter Password and enter your registration code.
If you have any questions about registration or our registration policy, please feel free to email us at sales@standalone.com.
1.3.4 Contacting Stand Alone Inc.
There are several ways to get in touch with us at Stand Alone, Inc. Email is the preferred Page of communication. If you have any questions, comments, suggestions or compliments, please do not hesitate to contact us through any of the methods listed below.
1.3.5 Business Hours
Stand Alone is open from 9 AM to 5 PM Monday to Friday. We are closed on Saturday and Sunday. These times are CST and GMT -5.
1.3.6 Email
Internet: info@standalone.com
1.3.7 Phone
Voice: (773) 477-2492
Fax: (773) 477-2579
1.3.8 Regular Mail
Stand Alone, Inc
3862 N. Lincoln, Floor 2
Chicago IL, 60613
USA
1.3.9 World Wide Web
1.4 Reporting Problems
If you find a problem in our software, it would be helpful if you reported it to us. To report a problem, please email us with Problem Report Request in the subject line. The email should include the following information: the type of Palm device you are using (i.e. Palm IIIx), the software name and version number (i.e. Super Names v1.5), the error message, a brief description of how we can recreate the error, and your name and email address so we can contact you when the problem has be fixed
When reporting problems, it is best to email us, rather than calling, so that the programmers have a written record of the information they need to solve the problem.
2 Installing and Upgrading Auto Slate
When installing Auto Slate, follow the normal procedure for installing any third party software for your Palm Powered device. These instructions can be found in your device's user manual. If you are upgrading Auto Slate from an earlier version, you should install the software without deleting the version already on your handheld. Your records will be available in the new version. If you are installing version 1.2 or above with Windows, then you will be able to install Auto Slate automatically using a stand-alone installer.
If you are using the installer and replacing a previously installed version, first select 'Remove installed components', finish the installer process, and run the installer again. You will not lose your data. This will place the newest program version in the Install folder of your Palm Desktop application, and it will also install the conduit. Please note that if you install the conduit, you must quit and relaunch the HotSync Manager in for the conduit to be activated.
Please note that before version 1.1, there was an event called 'Link' which was a generic event which associated an odometer reading with a date only. This event type was eliminated with version 1.1. If you are using Auto Slate with a version number below 1.1 and the database includes 'Link' events, upon upgrading, all of these events will be converted to trips and will appear in the Trips mode of the Main Page.
For Macintosh users, no installer is necessary. Instead, double click the the prc file to add it to your install list, and drag the Auto Slate Conduit file to your Conduits folder. For OS X users, the proper location is your Library->Application Support->Palm HotSync-> Conduits folder. If your handheld is not made by Palm, Inc, this sequence may be slightly different.
3 Restoring Auto Slate software and data
If your handheld crashes or is otherwise damaged, you may have to restore your data from your hard drive. The Auto Slate software file is labeled AutoSlate.prc, and the Auto Slate data file is labeled AutoSlateDatabase.pdb, or AutoSlate DB.pdb. Both of these files should be found in your backup folder, and should be continually modified and updated as you HotSync. If you must restore these files to your handheld, double click on them on the desktop so that the Install Tool is opened. The files should be automatically added to your install directory, and the files should be restored on the next HotSync.
If you have difficulty with this process, please call our technical support personnel.
4 Using Auto Slate
This chapter explains the basics of using Auto Slate.
Please note: All images in this manual show the appearance of Auto Slate when run on a color-capable Palm Powered device. If your device does not support color, Auto Slate will appear only in the colors supported.
4.1 Getting Started
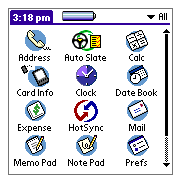
Once Auto Slate is installed, tap its icon to open it.
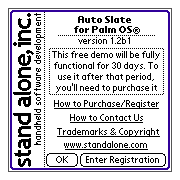
The About Auto Slate Page is displayed. Tap OK or Enter Registration if you have registered the product.
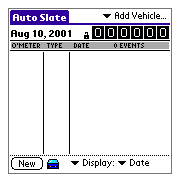
The Main Page is displayed.
Tap Add Vehicle
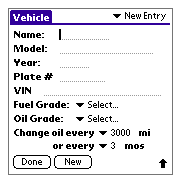
Enter vehicle information and tap Done
Tap New.
We will now add a Maintenance Event. Tap the Maintenance Button.
Enter details for a maintenance event.
Tap Done.
You've created your first event! Read further to learn about Auto Slate's other features.
4.2 Main Page
The Main Page displays the records entered into Auto Slate in tabular form.
Auto Slate stores two types of records, called Events and Trips. Events are actions done to the car for its upkeep and operation. Trips are distance intervals traveled by the car for specific purposes. Auto Slate displays Events and Trips separately. You can use Auto Slate to store Events or Trips exclusively, or both.
|
|
|
|
|
1. Main Page Control Elements |
2. Main Page Display Elements |
|
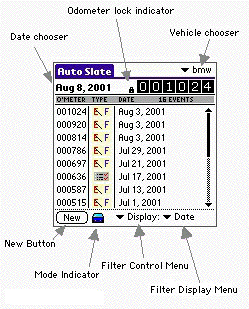
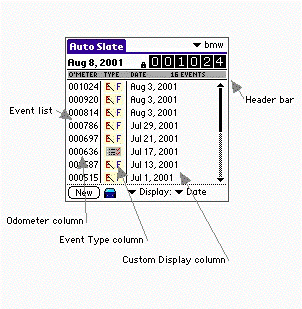
The elements of the Main Page are shown in Figures 1 and 2. Each of the elements in Figure 1 can be tapped by the user to elicit a response. The function of each of these elements is described below.
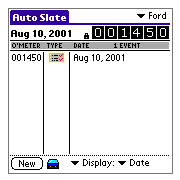
4.2.1 Mode Indicator
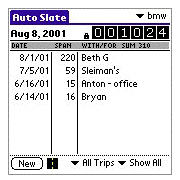
The contents of the Main Page display is determined by the display mode. When the mode is set to Trips, the mode indicator is a road, and the display is set up as in Figure 3. When in Events mode, the mode indicator is a car, and the display appears as in Figure 4.
To change the current mode, tap on the mode indicator, or choose Change Mode from the Events menu.
|
|
|
|
3. Main Page in Events Mode |
4. Main Page in Trips Mode |
4.2.2 Odometer
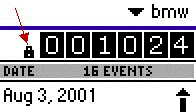
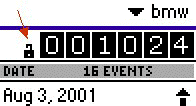
The odometer on the Main Page and the Trip Detail Page is a display control element which can be modified by the user. On the Main Page, the Odometer is accompanied by a lock indicator. This indicates the lock state of the odometer: when locked, the odometer can not be changed by tapping and dragging the stylus; when unlocked, the odometer is freely changeable. To change the odometer reading when the indicator shows an open lock, tap on the digit to be changed, and while the stylus is still against the screen, drag the stylus up or down. Note that the odometer's digits change as on a real odometer, with the adjacent digits changing appropriately.
Once the odometer is modified in this way, you should tap the lock indicator to lock the reading into the odometer. When locked, Auto Slate will store that reading with the vehicle record, and it will be displayed when the program is exited and re-entered. Also, the Main Page display filtering is based on the current locked odometer reading. If you change the odometer, then the events will be filtered based on the odometer reading only when that reading has been locked.
|
|
|
|
5. Odometer lock indicator in locked state |
6. Odometer lock indicator in unlocked state |
4.2.3 Main List
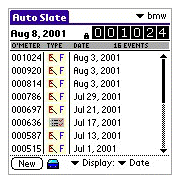
7. Main Page in Events Mode
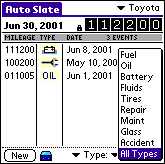
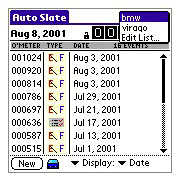
The Main List displays the information entered into Auto Slate, filtered by the settings of the various control elements. In Events mode, the display is formatted as follows: The event odometer reading is displayed in the first column. The second column contains an icon which designates the type of event. The third column varies based on the display choice, containing the date, cost, or vendor associated with the event. If more than 8 events are available, a scroll bar is visible. In Events Mode, the records are sorted in reverse order by odometer setting. The sort order cannot be changed.
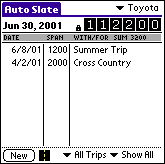
8. Main Page in Trips Mode
In Trips mode, the Main List displays trip records for the selected vehicle. The first column displays the date, the second column the distance traveled on each trip, and the third column displays the information entered on the With/For line of the Trip Detail Page (section 4.8). The date format may be changed using the Preferences Page (section 4.10). In Trips mode, the records are sorted in reverse order by date. The sort order cannot be changed.
The Main List is an active user screen. You may select a record to view by tapping on that record's display, then lifting the stylus over that display - the details of the selected trip or event is displayed. You may also tap within the list and drag up or down to scroll the list in either direction.
4.2.4 Filter Control and Filter Display Menu
These two menus are located in the lower right corner of the page. The Filter Control Menu and the Filter Display Menu work in tandem to filter events when in Events mode. The Filter Control Menu determines the content of the Display menu. There are three choices in the control menu - Display, Odometer, and Type.
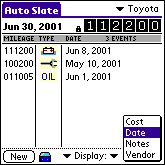
4.2.4.1 Filter Control Menu: Display
9. Filter Control Menu in Display Mode
When the Filter Control Menu reads Display, the Filter Display Menu provides options for the contents of the third column of the event list. The four options are: Cost, Date, Notes, Vendor. The column will be blank for a particular record if there is no data of the designated type in the record. Also note that for accidents, there is no display for cost, vendor, or notes.
The Header Bar (Figure 2) changes based on the setting of the Filter Display Menu. When Date, Notes, or Vendor is selected, the number of events available for display is shown in the Header Bar. When Cost is selected, the sum of the costs of all available events is displayed in the Header Bar, provided that 'Show Sum in Cost Display' is selected in the Preferences Page (Section 4.10).
4.2.4.2 Filter Control Menu: Odometer
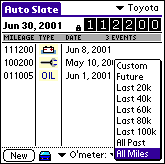
10. Filter Control Menu in Odometer Mode
When the Filter Control Menu reads Odometer, the Filter Display Menu shows a range of distance increments. These choices allow you to further filter the events displayed.
The options are:
Custom
Displays all events with odometer setting between the endpoints of the Custom Filter. The Custom Filter is a range set by the user. To access the setting, choose Set Custom Filter from the Events menu (section 4.2.10.5). Note that changing the Custom Filter will only affect the display immediately if Custom is selected in the display menu.
Future
Displays all events with odometer reading greater than the last reading locked into the odometer.
Last 20k, 40k, 60k, 80k
Displays all events with odometer reading up to 20,000, 40,000, etc. below the last reading locked into the odometer.
All Past
Displays all events with odometer reading below the last setting locked into the odometer.
All Events
Displays all events, regardless of odometer setting.
4.2.4.3 Filter Control Menu: Type
11. Filter Control Menu in Type Mode
When the Filter Control Menu reads Type, the Filter Display Menu shows the types of events available for display. If one is selected, the events list will be filtered to display only the events of a chosen type.
4.2.5 The Calendar and With/For Filter Menus
When in Trips Mode, the menus in the lower right hand corner of the Main Page are simpler than in Events Mode. There are two static menus available.
As in Events Mode, these menus filter the contents of the Main List.
4.2.5.1 Calendar Filter Menu
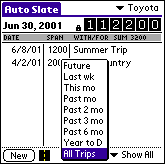
12. Calendar Filter Menu in Trips Mode
The Calendar Filter Menu filters trips by date range, as follows, based on the current date displayed in the Date Chooser (Figure 1) :
Future
All events later than the current date
Last wk
All events within 7 days of the current date
This mo
All events in the same month as the current date
Past mo
All events in the month prior to the current month
Past 2, 3, 6 mo
All events in the 2, 3, or 6 months prior to the current month
Year to D
All events in the current year up to the current date
All Trips
No filter
4.2.5.2 With/For Filter Menu
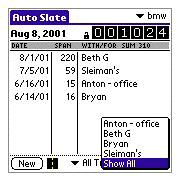
13. With/For Menu
The With/For Filter Menu filters trips by the name/subject entered in the With/For line of the trip record. The choices are listed alphabetically, with each unique entry represented. Selecting Show All at the bottom of the menu will remove any filter.
4.2.6 The New Button
The New Button is located in the lower left corner of the Main Page. Tap the New button to enter a new Trip or Event into the Auto Slate Database. The Events Page or Trip Detail Page will be displayed.
4.2.7 The Date Chooser
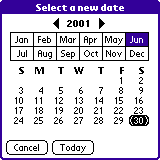
14. Date Selection Page
The Date Chooser is located to the left of the Odometer. The Date Chooser will always display the current date, based on the date entered into your Palm OS® system software. You may also manually alter the date if desired. The date set though this chooser is the date used for any new events entered into Auto Slate.
To select a date that is not the current date, simply tap on the date to select it. The Date Selection Page is displayed. Tap on a new Date to replace the original.
4.2.8 The Vehicle Menu
15. Vehicle Chooser Menu
This menu is located in the upper right of the page above the Odometer. Auto Slate allows you track information on up to 4 separate vehicles. Use this menu to select the vehicle you are currently tracking. Select Edit List to see or edit information about the currently selected vehicle, or to add or delete a vehicle. If you are using Auto Slate for the first time, the menu will read 'New Vehicle'.
4.2.9 The Main Page Events Menu
The Events Menu includes the following menu items: New Fuel Event, Show All, Change Mode, Next Oil Change, Set Custom Filter, Postpone Alarms, and Purge Records. To access the Events Menu, tap the Menu button, and select Events.
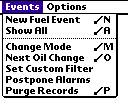
16. Main Page Events Menu
4.2.9.1 New Fuel Event
Select this option to create a new fuel event without going through the Events Page. This option is provided as Fuel is the most common event created.
4.2.9.2 Show All
Show All removes all filters from the current event list, and sets the filter menus to their default values.
4.2.9.3 Change Mode
This option toggles between the Trips and Events modes, and is the equivalent of tapping the Mode Indicator button.
4.2.9.4 Next Oil Change
This option will open a window displaying the odometer reading of the next scheduled oil change, and the odometer reading of the next oil change alarm, if oil alarms are set.
4.2.9.5 Set Custom Filter
This option sets the endpoints of the Custom Filter. See Section 4.2.4.2 for details.
4.2.9.6 Postpone Alarms
See Section 4.11.2.2 for more details
4.2.9.7 Purge Records
Select Purge Records to delete a range of records. The Purge Records Page is displayed. To continue, select a vehicle from the uppermost menu. Then, set the beginning and ending dates using the From and To date choosers. Then use the Types menu to select which type of record to purge. When you tap the Purge button and confirm the action, the records meeting the selected criteria will be deleted, and the number of records deleted will be shown. Tap Cancel leave the Purge Records Page without deleting any records.
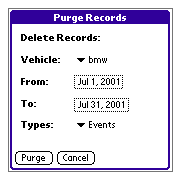
17. Purge Records Page
4.2.10 The Main Page Options Menu
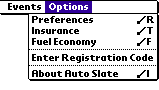
18. Main Page Options Menu
The Options Menu includes the following menu items: Preferences, Insurance, Fuel Economy, Enter Registration Code, and About Auto Slate. To access the Options Menu, tap the Menu button, and select Options
4.2.10.1 Preferences
This option opens the Preferences Page (section 4.10)
4.2.10.2 Insurance
This option opens the Insurance Page (section 4.9)
4.2.10.3 Fuel Economy
19. Fuel Economy Page
This option displays Fuel Economy Page (section 4.7). Tap the info icon at the upper right upper corner of the Page for more information about the Fuel Economy calculations.
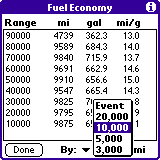
20. Fuel Economy Filter Menu
There is a popup menu on the right lower corner of this page which controls how the economy calculations are performed and displayed.
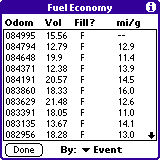
If Event is selected, each refueling is displayed, along with the economy calculations for that event. An F is shown in the Fill column if that refueling was a tank refill.
If instead a distance interval is selected, then refuel events are grouped by distance range, and the AVERAGE economy over that distance is displayed.
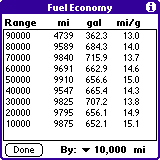
21. Fuel Economy with distance range selected
In the display above, 10,000 miles is selected. The calculations are performed as follows: The mi column displays the interval between the first fill-up and last fill-up of the given range, whose ceiling is the number displayed in the range column. In the above example, there were 9589 miles between the first and last fill-ups in the range 70000 to 80000 miles. The gal column displays the total fuel consumed to cover those miles, and the mi/g column displays the ratio of the 2nd and 3rd columns.
Tap Done to return to the previous Page.
4.2.10.4 Enter Registration Code
See Section 1.3
4.2.10.5 About Auto Slate
See Section 2
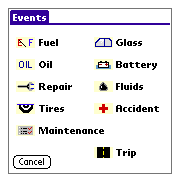
4.3 The Events Page
To access the Events Page, first set the Events/Trips icon to Events. Then, tap the New button.
22. Events Page
The Events Page presents a graphical menu from which you can select a new event to create. You may also tap the Cancel Button to return to the Main Page without making a selection.
If you tap an event button, the detail Page specific to the selected event is displayed.
4.4 Vehicle Page
23. Vehicle Page
The Vehicle Page displays information about your vehicle, and allows editing, adding, and deleting of vehicles. Remember that Auto Slate currently allows a maximum of 4 vehicles. Access the Vehicle Page by tapping on the Vehicle Pop-Up Menu and selecting Edit List.
4.4.1 Vehicle Menu
Use the Vehicle Menu at the upper right corner of the Page to choose the current vehicle to display or edit. If there is only one vehicle, only that name will be displayed.
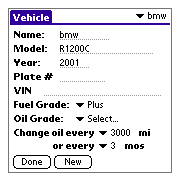
4.4.2 Data Entry Fields and Menus
Enter information about your vehicle in these areas. You may enter a preferred value for Fuel and Oil type. These types are saved with your vehicle, and are the defaults when a new fuel or oil event is entered. The fuel and oil lists are editable. See Alarms (section 4.11) for the function of the Change Oil popup menus.
4.4.3 New Button
Tap the New Button to automatically store the information you have entered about an existing vehicle, and to clear the data fields so that new information can be entered. Note that you cannot save vehicle information unless you have entered a name of any length. The New Button is inactive if there are already 4 vehicles in your database.
4.4.4 Done Button
Tap the Done Button to store information you have entered about a new or existing vehicle. The Vehicle Page will close, and the Main Page will be opened.
4.4.5 Delete Menu Item
![]()
24. Delete Menu Item
To access the Delete Menu, tap the Menu button while on the Vehicle Page. Select the Delete Menu item to delete the current vehicle completely. Be very careful when you delete vehicles, as you will be erasing the vehicle information, as well as all events associated with that vehicle.
4.5 Event Detail Page
The Event Detail Page reveals all of the stored information about a selected event, and allows for event deletion, editing, and creation.
25. Events Detail Page
4.5.1 Vehicle menu
The Vehicle Pop-Up Menu in the upper right corner of the page displays the currently selected vehicle, i.e. the vehicle associated with the displayed event. If you choose another vehicle from the menu, will be given the opportunity to change the owner of the event to a different vehicle. This function is useful if you associate an event with the wrong vehicle when created.
4.5.2 Date Chooser
The Date Chooser will display the date associated with an event. Tap on the chooser to select a different date if desired. If you are entering a new event, the chooser will display the date currently shown on the Main Page date chooser, which will frequently be the current date.
4.5.3 Odometer
The Odometer data field records the odometer reading of the car when the event took place. Edit the odometer as you would any text field.
4.5.4 Vendor
Many, but not all of the events forms contain the Vendor data line. See Section 3.6 for details of the Vendor Page.
4.5.5 Cost
Enter the cost of the event on this line.
4.5.6 Notes
Use for miscellaneous information.
4.5.7 Cancel Button
Tap the Cancel Button on the Display Page to return to the Main Page without saving any changes made in the event.
4.5.8 Done Button
Tap the Done Button on the Display Page to return to the Main Page and save any changes made to a new or existing event.
4.5.9 Events Menu
The Event Detail Page has one unique menu, Events, which contains the option Delete. Select Delete to erase the record that is displayed. After confirmation, the Page is closed.
4.5.10 Specific Event Detail Pages
Each event contains specific data fields where you may enter event information:
4.5.10.1 Fuel
Use the Fuel Page to record refueling your vehicle.

26. Fuel Event Detail Page
Amount
Enter the amount of fuel added in this line.
Grade
Tap the arrow to bring up the Grade Menu. Select the grade of gasoline from the menu.
Fill-Up
Check this box by checking it if the tank was filled. Auto Slate only compute fuel mileage between Fuel events which have the Fill-up box checked.
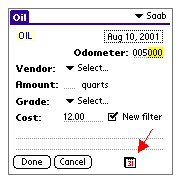
4.5.10.2 Oil
Use the Oil Page to record when oil is added to the vehicle.
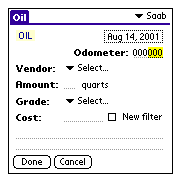
27. Oil Event Detail Page
Amount
Enter the amount of oil added on this line.
Grade
Select the grade of the oil from this menu. Select Edit List to go to the Edit List to add or remove grades from the list.
New Filter
Check this box by tapping it if the filter was replaced as well as the oil. Note that an oil alarm will only be set if this box is checked (see section 4.11.1)
Repair
Use this Page to enter information about repair work done on the vehicle.
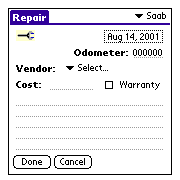
28. Repair Event Detail Page
Warranty
Check this box if a warranty was included with the repair.
4.5.10.3 Tires
Use this Page to record tire changes.
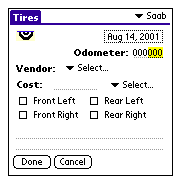
29. Tires Event Detail Page
Select
Tap Select to bring up a menu with three tire changes: Replace, Repair, and Rotate. Select the appropriate one from the list by tapping it.
Location Check Boxes
Record the location of the tire change by checking all appropriate locations. To check a location, tap the box next to it.
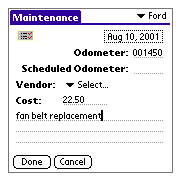
4.5.10.4 Maintenance
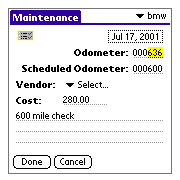
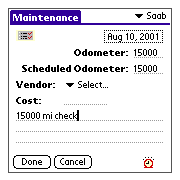
Use the Maintenance Page to record any maintenance performed on the vehicle.
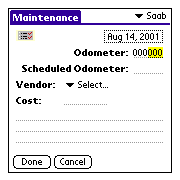
30. Maintenance Event Detail Page
Scheduled Odometer
Enter the odometer reading for scheduled maintenance on this line. For example, enter 30,000 on this line to record the standard scheduled 30,000 mile maintenance.
4.5.10.5 Glass
Use this Page to record any replacement of the vehicle's glass.
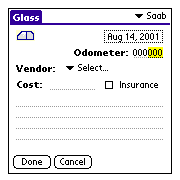
31. Glass Event Detail Page
Insurance
Check this box by checking it if the glass repair was covered by insurance.
4.5.10.6 Battery
Use this Page to record when the battery is replaced.
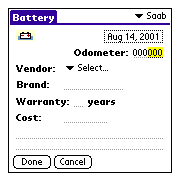
32. Battery Event Detail Page
Brand
Enter the brand of the battery on this line.
Warranty
Enter the number of years the battery is under warranty on this line.
4.5.10.7 Wash
Use this Page to record a car wash.
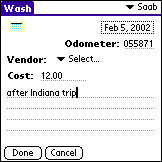
33. Wash Event Detail Page
4.5.10.8 Fluids
Use this Page to record information on the vehicle's fluids which are neither gas nor oil.
34. Fluids Event Detail Page
Fluid Type Check Boxes
Check the boxes next to the types fluids changed. Tap a box to check it.
4.5.10.9 Accident Pages
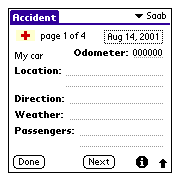
35. Accident Event Detail Page
The Accident Page is actually a series of four forms, each one storing unique information about an auto accident. You may scroll back and forth among forms using the Prev and Next Buttons. The first Page details the information for your car. The second Page contains the information for the other car involved in the accident. The third Page is for information on the other drive, and the fourth Page is for supplemental information.
Accidents differ from other events in the following way: When you leave an accident Page, all of the data in that Page is stored, and a new event is generated if none existed previously. There is no cancel button. Accidents may be deleted as are other events.
Tap the 'i' button in the lower right hand corner to bring up an information box with helpful information if you are involved in an accident.
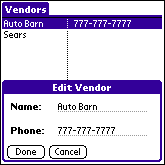
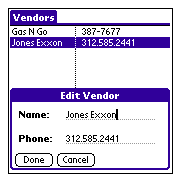
4.6 Vendor Page
Use the Vendor Page to edit the list of Vendors displayed in the Vendor Pop-Up Menu in the Event Detail forms.
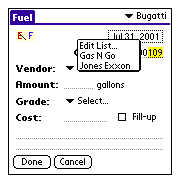
36. Vendor Popup Menu
Open the vendor Page by selecting Edit List... from the Vendor Pop-Up Menu. The Vendor Page contains five elements.
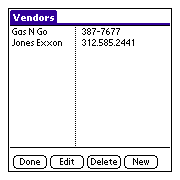
37. Vendor List Page
4.6.1 Vendor List
The Vendor List contains all available vendors, including their names, and any information in the 'Phone' field. Tap on the name of a vendor to highlight it.
4.6.2 New Button
Tap the New Button to add a new entry to the Vendor List. The Edit Vendor dialog box is displayed.
38. Edit Vendor dialog box
You may enter the name and phone number or other information into the respective fields. Tap Save to keep changes, or Cancel to disregard changes.
4.6.3 Delete Button
Tap the Delete Button after selecting a vendor to remove the entry from the vendor list. If you delete a vendor which has already been linked to an event, then the display Page for that event will display Deleted on the Vendor Pop-Up Menu.
4.6.4 Edit Button
39. Edit Vendor Page
Tap the Edit Button to open the Edit Vendor dialog box. Information about the selected vendor will be displayed in the dialog box. Change the information in the Edit Vendor box to modify a Vendor entry.
4.6.5 Done Button
Tap the Done Button to close the Vendor Page and return to the Event Detail Page for the currently selected event.
Note that if a vendor is selected when the Done button is tapped, that vendor will be linked to the currently selected event, and that name will appear on the Event Detail Page Vendor Pop-Up menu.
4.7 Fuel Economy Page
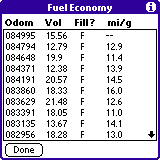
40. Fuel Economy Page
Open the Fuel Economy Page by selecting Fuel Economy from the Main Page Events Menu.
The Fuel Economy Page automatically calculates miles/gallon, or km/li, for fuel usage.
Important Note:
The calculator can only compute mileage between tank fills. Once a fill-up has been followed by a subsequent fill-up, the mileage is calculated and displayed for the initial fill. Mileage is never displayed for the most recent fill-up, nor for any non-fills. If you find a wide variation in mileage calculations, it may be that you have missed recording a re-fuel, or entered the mileage or fuel volume erroneously.
4.8 Trip Detail Page
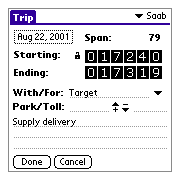
41. Trip Detail Page
The Trip Page contains details of a trip record. Trips are records which contain a starting and ending odometer reading, a category designated 'With/For', a date, and notes. Trips are designed for users who need to track distances traveled for specific purposes.
A new trip can be created in two different ways. In Trips mode, tap the New button on the Main Page. You may also tap the Trip button on the Events Page (See section 4.3). To access the Trip Page for Trips you have already entered, go to the Main List when the Event/Trip Icon is set to Trips, and tap on the Trip you wish to view.
Vehicle Pop-Up Menu
Use this menu to select the vehicle assigned for the Trip. You may change the vehicle associated with a trip once the trip record is created.
Date chooser
Tap to set or change the date associated with the Trip.
Odometers
The Trip Detail Page contains two odometer which display the starting and ending settings for a Trip. Note that the ending odometer may not be set to a value less than the starting odometer. The starting odometer also comes with a lock button, which operates as on the main page. When locked, the starting odometer is fixed, while the ending odometer can change freely. When unlocked, the starting odometer can be changed, and will always remain less than or equal to the ending odometer.
Span
The span figure is the difference between the starting and ending odometer settings.
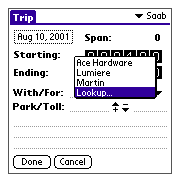
42. With/For Menu
With/For
With/For is a category field for grouping related trips. You may enter any value in this field - it is designed to contain information regarding with whom or for whom/what the trip was taken. The popup trigger to the right of the field will display a menu of all items contained in existing records. The last option in the menu is a lookup link to the address book, from which you may import any entry directly.
Notes
Enter any further notes for the Trip on the lines below the With/For line.
4.9 Insurance Page
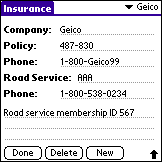
43. Insurance Page
The Insurance Page is a text entry Page for storing information about Insurance coverage. As of version 1.23, you may enter an unlimited number of insurance records. Access the Insurance page by choosing Insurance from the Options Menu.
When more than one insurance record is available, a popup menu on the upper right corner of the screen will show each of the available records. Select one to view or edit it.
For each record, edit the desired information in the editable fields.
Three buttons are available:
New button – Tap this button to add a new record. The fields will be erased, and 'New Entry' will appear in the upper right corner of the screen.
Delete button – Tap this button to delete a record. A confirmation dialog box will appear first.
Done button – Tap this button to exit the insurance records screen.
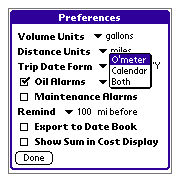
4.10 Preferences Page

44. Preferences Page
The Preferences enables you to customize the operation and display of Auto Slate.
There are 8 options.
Volume Units
These are the units used for measuring volumes of fuel and oil.
Distance Units
These are the units for measuring traveling distances.
Trip Date Form
This is the format used for the first column of the Main Page in Trips Mode.
Oil Alarms, Maintenance Alarms, Remind
See Section 4.11 for the operation of these options.
Export to Date Book
See Section 4.12 for the operation of this option
Show Sum in Category
When unchecked, the sum of the cost of all filtered events is NOT displayed in the header bar on the Main Page.
4.11 Alarms
The Alarms functions are designed to make you aware of future events which come due at a specific date or odometer setting. There are two separate alarms: Maintenance alarms and oil change alarms. They operate independently, and will be described separately.
45. Alarm Settings in Preferences Page
4.11.1 Oil Alarms
To activate oil alarms, check the box labeled Oil Alarms in the Preferences Screen. A menu will appear, with the following choices: Odometer, Calendar, or both.
4.11.1.1 Odometer Oil Alarms
These are alarms based on the odometer setting. To activate these alarms, choose O'meter or Both from the menu in the Preferences Page.
Please refer to the Vehicle Page in Section 4.4. Note that you may set the frequency of oil changes by distance traveled. Odometer alarms are based on this setting.
Once activated, oil odometer alarms are automatic. This means that you do not have to set the alarms manually as you must with maintenance alarms.
Auto Slate will automatically track your last oil change, so long as with each change you check the New Filter box in the Oil Detail Page. Your next change will be scheduled for the odometer setting of your last change plus the increment indicated on your Vehicle Page for each vehicle. The Remind menu in the Preferences Page indicates the increment in advance of the scheduled oil change that the alarm will be activated.
For example, if you change your oil at 5000 miles, and set the Vehicle Page setting to 'Change oil every 3000 miles', and the Preferences to 'Remind 100 mi before', your first alarm will be activated at 7900 miles (5000 + 3000 - 100) . You may check this by selecting Next Oil Change from the Main Page Events Menu. The following dialog will appear:
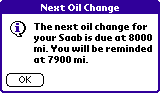
46. Next Oil Change Page
Odometer alarms are displayed when Auto Slate is first opened. At the first time that Auto Slate is opened with the odometer setting at or above the alarm threshold - in this case 7900 miles - a dialog box will appear.
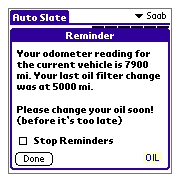
47. Oil Odometer Alarm
Checking Stop Reminders before closing this page will deactivate oil alarms. If you leave this box unchecked, the reminder dialog box will reappear after an increment of 100 mi or km.
4.11.1.2 Calendar Oil Alarms
Calendar alarms are set in the Palm OS Date Book, and not in Auto Slate itself. Activate Calendar Alarms by selecting Calendar or Both in the Preferences Page Oil Alarm Menu..
The increment for Calendar alarms are set in the Vehicle Page for a given vehicle, by choosing from the menu ' Change oil every x months.'
Like odometer alarms, calendar alarms are set automatically once the feature is activated.
When you save an oil event with New Filter checked, Auto Slate checks to see whether this oil change is your most recent. If so, it adds the time increment specified, inserts a 7-day alarm in the date book, and displays the following confirmation:
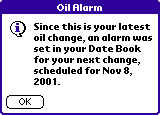
48. Oil Calendar Alarm Dialog
The time increment for 3 months is 90 days, for 6 months 180 days, etc. You may modify the alarm in the Date Book.
Once an alarm is set, Auto Slate does not remove it, so it will remain even if Oil Alarms are subsequently deactivated.
4.11.2 Maintenance Alarms
Maintenance Alarms are designed differently from Oil Alarms. The main differences are that you must set them manually, and that only odometer and not calendar alarms are available.
Maintenance Alarms, like Oil Alarms, are activated in the Preferences Page. Check the box next to Maintenance Alarms. The advance notice increment set with the menu labeled Remind in the Preferences Page also applies to Maintenance Alarms.
These alarms are set in the Event Detail Page.

49. Inactiavated Alarm
In Figure 46 the faded alarm clock in the lower right hand corner of the Page indicates that Maintenance Alarms have been activated in the Preferences Page, but that no alarm has been set for the displayed event. To set an alarm, tap on the alarm clock, The clock will become bold, as in Figure 47.
50. Activated Alarm
The alarm is designed to notify you when an event is due. If you set an alarm for an odometer setting that is less than the current setting (i.e. in the past) then Auto Slate will confirm with you whether you want to set an alarm.
Once an alarm is set, the alarm will activate when the odometer reaches the threshold setting for that event, which is the odometer reading for the event less the advance notice increment set in the Preferences Page.
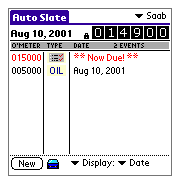
51. Maintenance Alarm
When the alarm is activated, the event record will display 'Now Due' in the third column of the Main Page. On color handhelds, all alarmed events are colored red.
When you enter the Main Page and an alarm has been activated, the following dialog appears:
52. Activated Alarm Dialog
This is meant to notify you that activated alarms are linked to your vehicle.
4.11.2.1 Fulfilling Alarms
If you would like to perform the event for which an alarm has been set, simply Tap on the event in the Main Page Event List, fill in the event information, and tap the clock icon to turn off the alarm.
4.11.2.2 Postponing Alarms
If the odometer setting for an alarm has passed, and the alarm event/action has yet to be performed, you will receive an alarm reminder each time you open Auto Slate. To defer these reminders to a later odometer setting, select Postpone Alarms from the Main Page Events Menu. This action will change the odometer setting for each activated alarm event to a setting in the near future.
4.12 Exporting to Date Book
Auto Slate now enables you to export events and trips to your Palm OS Date Book.
To enable this feature, check the box labeled Export to Date Book in the preferences screen.
When enabled, new events or trips will be automatically exported to the Date Book
When an event has been exported, a date icon appears on the detail page.
53. Exported Event Icon
Tap the icon to remove the record which has been exported. The record will be removed from the date book, and the icon will fade. Tap the icon again to restore the record.
If an existing record is opened, and the bold date icon appears, then that event already appears in the Date Book.
If a record which has been exported to the Date Book has been modified, then the Date Book record will be modified as well.
You may use the Date Book to modify any of the exported records, but Auto Slate will only recognize them if the basic data - vehicle name and odometer setting - are unchanged.
4.13 Using the Auto Slate Conduit
Please read the following carefully:
The Auto Slate Conduit enables you to export your data from your handheld to a pre-formatted text file on your desktop hard drive. It is a one-way conduit, and does not permit importing data from the desktop.
Follow the installation instructions in this manual for details on installing the conduit correctly. Once installed, the conduit will work automatically in the background during a HotSync. It can be turned on or off using the Custom menu in the HotSync manager.
The HotSync Manager gives you options for handling the backed up database file on your desktop. These options do not affect how the conduit creates the text file.
If you have installed the conduit accompanying any version prior to 1.22, then the conduit may not work correctly. It should simultaneously export your data to your hard drive and back up a copy of your database to the hard drive. Versions of the Windows conduit PRIOR to 1.22 (conduit version 1.1) will not perform the backup.
WINDOWS USERS:
If you are installing Auto Slate version 1.25, then the accompanying conduit version is 1.3.
If you are upgrading the conduit, make sure to do the following:
1. Run the installer, and when prompted, select 'Remove installed components.' This will neither delete the program from your Palm, nor interfere with your data. If this option is not presented, you do not currently have the conduit installed.
2. Click next until the installer is completed. In most cases, the default settings will be correct for your system.
3. Rerun the installer. Select at least the conduit to install, if not the program and the manual.
4. Complete the installation.
5. QUIT your HotSync Manager, and relaunch it.
6. From the HotSync Manager, select the custom menu. From the list presented, double click on 'Auto Slate Conduit.'
7. Make sure that 'Handheld overwrites desktop' is checked.
8. Close this window.
9. Perform a HotSync.
When you HotSync with the properly installed conduit, a file called 'AutoSlateExport.txt' or 'AutoSlateExport.xls' will be created in your Palm, Handspring, or Sony folder (or equivalent) on your hard drive. The file will be stored within the folder that is labeled with your Palm user name or HotSync name.
When you locate the file, if its extension is '.txt', you may double click on it to open it with Notepad; however, it will not be formatted correctly. For better results, open a spreadsheet application such as Microsoft Excel, find the file, and open it via that application. If you then choose Select All, and then Format->Column->AutoFit Selection, the file will be optimally formatted.
If the extension is '.xls', double clicking on the file will open Microsoft Excel.
Please contact us if you have problems with the operation of your conduit.
Conduit upgrade history:
Version 1.0 - September 2001 - allows exporting data to a text file, but does not allow the database to be backed up to your desktop machine concurrently.
Version 1.1 - December 2001 – fixes the error preventing the database from being backed up.
Version 1.2 - February 2002 – adds car washes to the backup file
Version 1.3 - March 2002 - corrects database backup problems, and saves export as an Excel file.
MACINTOSH OS X USERS-
Once the conduit is installed, it will work silently in the background. In the folder corresponding to your user name on your hard drive (in the Palm or corresponding folder for other manufacturers) you will find a Microsoft Excel® spreadsheet with your exported data. This should also be able to be opened by other spreadsheet software. The file is labeled AutoSlate_(TODAY’S DATE).xls. A new file is created after each HotSync, so be sure to delete all of the old spreadsheets regularly if you HotSync every day.
Auto Slate is a trademark of Stand Alone,
Inc.
Palm Powered is a trademark of Palm, Inc.
HotSync and Palm OS are registered trademarks
of Palm, Inc.
Excel is a registered trademark of Microsoft,
Inc.